Using SSIS to Automatically Populate a SharePoint List

In my opinion, the best (and easiest) way to accomplish this goal is using SSIS packages and a component from Codeplex called Sharepoint List Source and Destination. Ray Barley wrote a tip regarding this component a while back and he explained how to extract data from Sharepoint. I encourage everyone to check out his tip as it explains how to install the component and has some very good tips regarding the Sharepoint Source task. In this post, we’ll go over the Destination task in more detail.

Setup a Sharepoint List

For this tip, I’m just going to set up a quick custom list. This example is done in Sharepoint 2007, but Sharepoint 2010 should be close to the same.

Go to Site Actions, Create:

SQL Freelancer SQL Server Sharepoint Populate List
Custom Lists, Custom List:

SQL Freelancer SQL Server Sharepoint Populate List
For this example, I’ll create a list called SQL Versions:
SQL Freelancer SQL Server Sharepoint Populate List
Once I have a list created, I need to create a view with custom columns that match my SQL query. For this example I need Server Name, Instance Name, and Build. To create a view click Settings, Create View:

SQL Freelancer SQL Server Sharepoint Populate List
Choose Standard View:

SQL Freelancer SQL Server Sharepoint Populate List
Name the View (for this example, I’ll name it SQLVersionView and make it my default view):
SQL Freelancer SQL Server Sharepoint Populate List
Next we’ll need to create custom columns. Go to Settings, List Settings:

SQL Freelancer SQL Server Sharepoint Populate List
To create the first column click Title and rename it to Server Name:

SQL Freelancer SQL Server Sharepoint Populate ListSQL Freelancer SQL Server Sharepoint Populate List
Click here to view the rest of this post.

Data Driven Colored Text for Reporting Services Reports

In SSRS you can use data driven expressions to color code certain rows. This post will show you how to accomplish this.

First thing is first. I’m assuming you already have a report created. In this example, I’m using the AdventureWorks database and I’m running a report on Name, Email, Hire Date, Title and Pay Rate:

SQL Freelancer SQL Server SSRS

Formatting Needs

I want to distinguish three different levels of pay. If the Employee makes $10.00 or less I would like to change the text Red. If the employee makes between $10.01 and $20.00 I would like to keep the text Black and if the employee makes more than $20.00 I would like to change the text Green.

Changing Text Color

First, go to the Design tab of Designer view and select all the fields in which the color of text needs to change. In this example, I’ll select all fields.

SQL Freelancer SQL Server SSRS
Next, I’ll go to the Properties Window. If you don’t see this window you can choose View, Properties or simply hit F4.

In the Properties Window click the arrow beside Color and choose Expression:

SQL Freelancer SQL Server SSRS

In the Expression box type your VB expression and click OK. In this example I’m using the following:

=SWITCH(Fields!Pay.Value <= 10, "Red", Fields!Pay.Value >= 20, "Green")

SQL Freelancer SQL Server SSRS
Click here to view the rest of this post.

Creating an SSRS Map report with data pinpoints

SQL Server Reporting Services has some cool features such as displaying maps and data points on the maps.  In this post I’ll show how to take a list of addresses and display them as pinpoints on a map in an SSRS report.

With SSRS 2008R2 you have the capability of adding maps to your reports using spatial data. In this tip I’ll show you how to accomplish this.

If you have a table with addresses, zip codes, etc. we’ll need to find the latitude and longitude of each address. You can accomplish this by using a geocoding website. There are many out there but I use http://www.gpsvisualizer.com/geocoder/ because it’s fast and easy to copy and paste multiple addresses into their input box, click “start geocoding” and within seconds it will output latitude and longitude information.

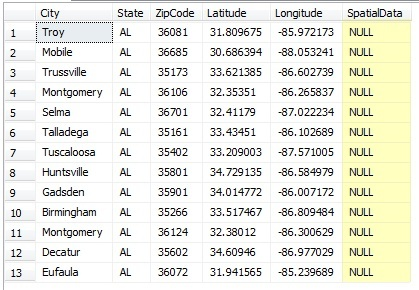
Once you get the latitude and longitude information you can import it into your database. See below for an example of my table of Alabama cities and zip codes with their appropriate coordinates.

SQL Freelancer SQL Server SSRS Maps

Once you have your coordinates we will need to create a new column with a geography data type that we will add our spatial data into. The following code will accomplish this.

ALTER TABLE ZipCodes ADD SpatialData geography

We should now have a table that looks like below:

SQL Freelancer SQL Server SSRS Maps

Inserting the data into the SpatialData column can be time consuming if you have a lot of records. The best way I have figured out how to do this is to use a basic UPDATE statement. Below is my script I have created for my table for this example.

UPDATE ZipCodes SET SpatialData = 'POINT(85.972173  31.809675)' WHERE ZipCode = 36081 
UPDATE ZipCodes SET SpatialData = 'POINT(88.053241  30.686394)' WHERE ZipCode = 36685
UPDATE ZipCodes SET SpatialData = 'POINT(86.602739  33.621385)' WHERE ZipCode = 35173
UPDATE ZipCodes SET SpatialData = 'POINT(86.265837  32.35351)' WHERE ZipCode = 36106 
UPDATE ZipCodes SET SpatialData = 'POINT(87.022234  32.41179)' WHERE ZipCode = 36701 
UPDATE ZipCodes SET SpatialData = 'POINT(86.102689  33.43451)' WHERE ZipCode = 35161 
UPDATE ZipCodes SET SpatialData = 'POINT(87.571005  33.209003)' WHERE ZipCode = 35402 
UPDATE ZipCodes SET SpatialData = 'POINT(86.584979  34.729135)' WHERE ZipCode = 35801 
UPDATE ZipCodes SET SpatialData = 'POINT(86.007172  34.014772)' WHERE ZipCode = 35901 
UPDATE ZipCodes SET SpatialData = 'POINT(86.809484  33.517467)' WHERE ZipCode = 35266 
UPDATE ZipCodes SET SpatialData = 'POINT(86.300629  32.38012)' WHERE ZipCode = 36124 
UPDATE ZipCodes SET SpatialData = 'POINT(86.977029  34.60946)' WHERE ZipCode = 35602 
UPDATE ZipCodes SET SpatialData = 'POINT(85.239689  31.941565)' WHERE ZipCode = 36072

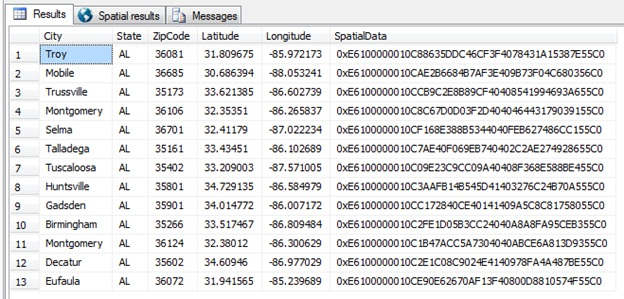
Once you update your table with the spatial data and run SELECT * FROM ZipCodes you should see the following output:

SQL Freelancer SQL Server SSRS Maps
Click here to view the rest of this post.