sp_who

There are numerous ways you can view blocking information but I’ll share the most popular in sp_who and sp_who2.

Like their name implies sp_who and sp_who2 give information about “who” is in your SQL Server as well as other useful information including processes and blocking info.

Below is an example of sp_who running against a SQL Server:

SQL Freelancer SQL Server sp_who

As you can see, sp_who will return SPID, status, loginname, blk, dbname, etc.

spid – The system process ID.
ecid – The execution context ID of a given thread associated with a specific SPID.
status – The process status.
loginame – The login name associated with the particular process.
hostname – The host or computer name for each process.
blk – The system process ID for the blocking process, if one exists. Otherwise, this column is zero.

When a transaction associated with a given SPID is blocked by an orphan distributed transaction, this column will return a ‘-2′ for the blocking orphan transaction.
dbname – The database used by the process.
cmd – The SQL Server command (Transact-SQL statement, SQL Server internal engine process, and so on) executing for the process.

Statistics IO and Statistics TIME

Statistics IO and Statistics TIME can help in performance tuning from a granular level and saves time compared to Execution Plans, SQL Server Profiler, etc. Let’s looks at an example of these two commands:

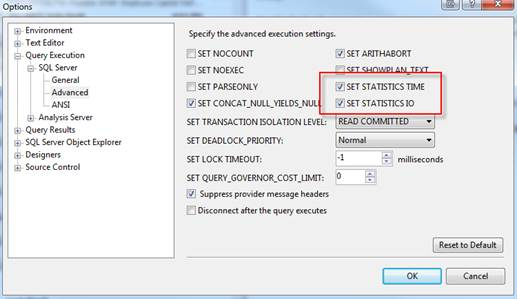
There a few different ways in which you can turn on these commands inside SQL Server Management Studio. If you want every query window to open up with statistics you can go to Tools, Options, Query Execution, SQL Server, Advanced and check SET STATISTICS TIME and SET STATISTICS IO:

SQL Freelancer SQL Server SET STATISTICS TIME SET STATISTICS IOMost of the time you will just want to use statistics for a certain troublesome query. To turn these commands on for a specified query window, open the query window and go to Query, Query Options, Execution, Advanced and check SET STATISTICS TIME and SET STATISTICS IO:

SQL Freelancer SQL Server SET STATISTICS TIME SET STATISTICS IOOr you can simply use T-SQL and type the following to turn statistics on

SET STATISTICS IO ON
SET STATISTICS TIME ON

And to turn off simply use:

SET STATISTICS IO OFF
SET STATISTICS TIME OFF

In this example I’m going to run a query from AdventureWorks using statistics:

SET STATISTICS IO ON
SET STATISTICS TIME ON

SELECT pc.FirstName
,pc.LastName
,pc.EmailAddress
,he.Title
,hh.Rate
FROM Person.Contact pc
JOIN HumanResources.Employee he ON pc.ContactID = he.ContactID
JOIN HumanResources.EmployeePayHistory hh ON he.EmployeeID = hh.EmployeeID
WHERE hh.Rate > 10
ORDER BY hh.Rate

After the query finishes it will show you results like normal but if you click on the Messages tab you will see some extra information:

SQL Freelancer SQL Server SET STATISTICS TIME SET STATISTICS IO

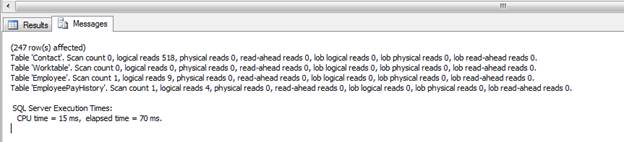
You will see IO information at the top:

Scan Count – Number of index or table scans
Logical Reads – Number of pages read from the data cache
Physical Reads – Number of pages read from disk
Read-Ahead Reads – Number of pages placed into the cache for the query
LOB Logical Reads – Number of text, ntext, image, or large value pages read from the data cache
LOB Physical Reads – Number of text, ntext, image, or large value type pages read from disk
LOB Read-Ahead Reads – Number of text, ntext, image, or large value type pages placed into the cache for the query

Execution TIME information will be directly below:

CPU Time: How long the query worked with the CPU
Elapsed Time: How long the query took to gather data

Statistics, in general, is an excellent starting point to see why you might have a poor performing query. You can gather results such as execution time, compile time, reads, writes, cost, etc.

SQL Server Multi Server Administration

I seem to notice a lot of people do not use or even know about Multi Server Administration for their SQL Server Agent Jobs and Maintenance Plans. Multi Server Administration can be really useful when you need to create and run the same jobs or maintenance plans across numerous SQL Server instances. Let’s walk through setting up Multi Server Administration for SQL Server.

Here’s a basic look at how to setup Multi Server Administration. My environment has two separate VM’s running in VM Workstation with Windows 2008 R2 Datacenter Edition and SQL Server 2008 R2 Enterprise named Principal and Mirror.

First thing I’m going to do is register both servers in SQL Server Management Studio (SSMS). If you do not see the Registered Servers tab in SSMS navigate to ‘View’ | ‘Registered Servers’ or press ‘Ctrl + Alt + G’.

SQL Freelancer Multi Server AdministrationOnce both servers are registered I can start configuring Multi Server Administration. To do this right click on ‘SQL Server Agent’ on your master server and choose ‘Multi Server Administration’ | ‘Make this a Master…’ to begin the process.

SQL Freelancer Multi Server Administration

Click Next on the Welcome for the Master Server Wizard.

The next screen is where we can configure an operator. Just like when we create an operator for local jobs, we can create one for our Multi Server jobs. You can also leave this section blank if you prefer not to have an operator although I would not recommended this practice. Once completed, press the ‘Next’ button to continue.

Click here to view the rest of this post.

Configure SQL Server Database Mirroring Using SSMS

In this post I am going to outline my environment and then walk through the process of setting up Database Mirroring.  This will include the configurations, backups, restores and verification process.  Let’s jump in.

My test environment consists of two separate VM’s running VM Workstation with Windows 2008 R2 Datacenter Edition and SQL Server 2008 R2 Enterprise named appropriately Principal and Mirror. The SQL Server and SQL Server Agent Services accounts are running as domain users (DOMAIN\User). Windows Firewall is OFF for the sake of this example.

I created a database on the Principal SQL Server instance and named it TestMirror. The recovery model is set to FULL RECOVERY.

SQL Freelancer Multi Server Administration

1st step: Issue a full backup of the database.

BACKUP DATABASE TestMirror TO DISK = 'C:\Program Files\Microsoft SQL 
Server\MSSQL10_50.MSSQLSERVER\MSSQL\Backup\Backup.bak';

2nd step: Issue a transaction log backup of the database.

BACKUP LOG TestMirror TO DISK = 'C:\Program Files\Microsoft SQL 
Server\MSSQL10_50.MSSQLSERVER\MSSQL\Backup\Backup.trn';

Below are the two files in the file system:

SQL Freelancer Configure SQL Server Database Mirroring
Click here to view the rest of this post.