Always On Availability Group Latency Reports

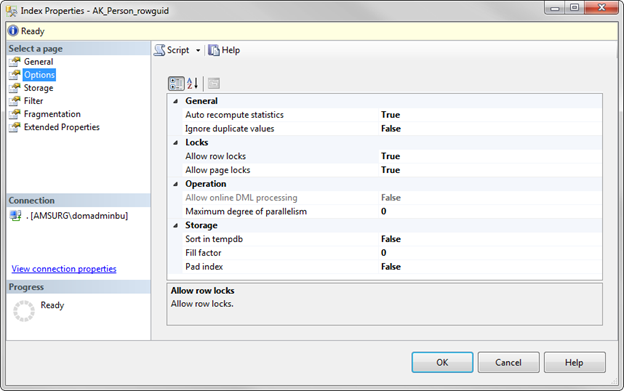
With SQL Server 2012 we introduced Always On Availability Groups, and the Always On Availability Group Dashboard in SQL Server Management Studio (SSMS). This dashboard can be utilized by database administrators to view the current health of an Availability Group and its availability replicas and databases. While the dashboard can be configured to provide information regarding the latency between Primary and Secondary Replicas (can be calculated using the Commit LSN, Sent LSN and harden LSN values), it does not provide insights into the reason for the latency. To understand the reason for latency, requires capture and analysis of Extended Events and Performance Monitor counters. This activity can be time consuming and requires extensive knowledge of the Extended Events associated with Always On.

With the new SSMS 17.4 release, we are introducing the Availability Group Latency data collection and reporting built into the Availability Group dashboard. This feature masks the capture and analysis of the Extended Events from the end user and provides an easy to understand report detailing the time spent during the various phases of the Log Transport process.

What to use it for?

The Latency data collection functionality and the associated reports allows a database administrator to quickly discern the bottleneck in the log transport flow between the Primary and the Secondary replicas of an Availability Group. This feature does NOT answer the question “Is there latency in the Availability Group deployment?” but rather provides a way to understand why there is latency in the Availability Group Deployment. This functionality provides a way to narrow down the potential cause of latency in an Availability Group deployment.

How does it Work?

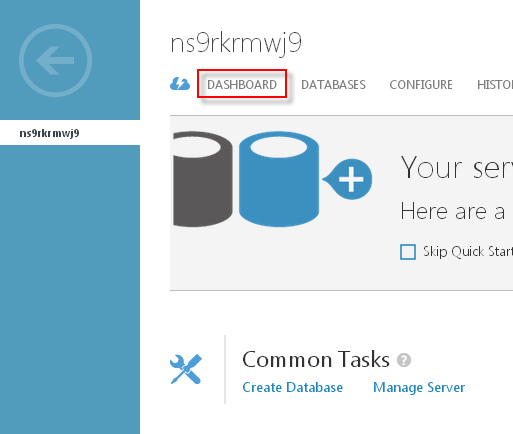
As seen below, the Availability Group Latency Data Collection functionality can be accessed from the Availability Group Dashboard.

Click here to view the rest of this post.

SSMS SQL Server Diagnostics

Microsoft is releasing the SQL Server Diagnostics (Preview) extension within SQL Server Management Studio and Developer APIs to empower SQL Server customers to achieve more through a variety of offerings to self-resolve SQL Server issues.

What this offers to our customers?

Analyze Dumps – Customers using this extension will be able to debug and self-resolve memory dump issues from their SQL Server instances and receive recommended Knowledge Base (KB) article(s) from Microsoft, which may be applicable for the fix. The memory dumps are stored in a secured and compliant manner as governed by the Microsoft Privacy Policy.

Click here to view the rest of this post.

SQL Server Management Studio 2015

Microsoft SQL Server Management Studio is a product I use throughout the day, every day. I’ve tried using other environments to access and manage SQL Server, but SSMS is what I learned using and what I always go back to. The problem with SSMS was that you couldn’t download it individually. You always had to have a licensed copy of SQL Server or install SQL Server Express with Tools to get this…..until now!

Microsoft has finally released a standalone download of SSMS. This release supports SQL Server 2016 through SQL Server 2005. It also provides the greatest level of support when working with Azure.

Some enhancements include:

  • New SSMS Installer – SSMS can now be installed with a light weight stand-alone web installer.
  • SSMS Updates – Receive notification within SSMS when new updates are available, and choose to install them at your convenience.
  • Enhanced SSMS support for Azure SQL Database – Several fixes and enhancements, including expanded SQL Server Management Objects (SMO) coverage, and an updated Import/Export wizard.

Let’s step through the install:

Download the SSMS-Web-Setup.exe from here.

Start the install, agree to the license terms, and click Install.SSMS 2015 SQL Freelancer


It should take a few minutes, but once this completes restart your computer and that’s it! Easy install.

SSMS 2015 SQL Freelancer 2


SQL Server Index Properties in Management Studio

Understanding indexes and how they work can be complicated enough for a Jr. DBA, but throw in all the different options and properties and an index can soon be overwhelming. In this post, I’ll discuss the different options available when creating a basic index.

To create an index using SSMS, expand the tree for a table and right click on Indexes and select New Index: (This tip will not discuss the anatomy of an index, but will focus on the properties.)

SQL Freelancer SQL Server Index Properties

After choosing the index type, you will notice that there a few tabs on the left side that will define how your index will act. These tabs will differ between SSMS versions but basically have the same information. In this tip, we’ll be using SQL Server 2012 SSMS.

The first tab, General, is where you can set the index name, the key columns, and the included columns (if any). This tab also shows the table name and index type you selected:

SQL Freelancer SQL Server Index Properties
The next tab, Options, is where you can view or modify the properties for the index:

SQL Freelancer SQL Server Index Properties

Let’s go over each property.

Index Properties Options Page

We will begin with the options page.

Auto recompute statistics

This property defines whether or not you want SQL Server to automatically update the index statistics. Best practice is to leave this option set to True, otherwise you will have to manually update the statistics.

According to Microsoft, statistics are considered outdated when the following happens:

  • The table size has gone from 0 to >0 rows.
  • The number of rows in the table when the statistics were gathered was 500 or less, and the column modification counters (colmodctr) of the leading column of the statistics object has changed by more than 500 since then.
  • The table had more than 500 rows when the statistics were gathered, and the colmodctr of the leading column of the statistics object has changed by more than 500 + 20% of the number of rows in the table when the statistics were gathered.

Outdated statistics can lead to performance problems.

As the link above states, the statistics auto update is triggered by query optimization or by execution of a complied plan, and it involves only a subset of the columns referred to in the query.

Ignore duplicate values

This property specifies where a duplicate key value can be inserted into the column that is part the index. If set to “True”, SQL Server will issue a warning when an INSERT statement is about to create a duplicate key and will ignore the duplicate row. If this option is set to “False”, SQL Server will issue an error message and rolls back the INSERT statement.

Example:

In this example (AdventureWorks2012.Person.Person), I have a Non-clustered, unique index. My key column is rowguid.

SQL Freelancer SQL Server Index Properties
I’ve set the Ignore duplicate values to “False”

SQL Freelancer SQL Server Index Properties

If I try to INSERT a duplicate value for rowguid, I get the following error:

Msg 2601, Level 14, State 1, Line 1 Cannot insert duplicate key row in object ‘Person.Person’ with unique index ‘AK_Person_rowguid’. The duplicate key value is (92c4279f-1207-48a3-8448-4636514eb7e2). The statement has been terminated.

If I change the Ignore duplicate values to “True” and try to INSERT a duplicate value for rowguid I get the following:

(0 row(s) affected)

As you can see, neither of these inserted the duplicate value because it was a UNIQUE index but one returned an error message and ended the statement while the other didn’t return an error. If I was inserting multiple records the first message would have rolled back the transaction while the second message would have inserted all the unique values and skipped over the unique record.

The default value for this option is “False” and can only be used on UNIQUE indexes.

Click here to view the rest of this post.

Using the Deploy Database to SQL Azure Wizard in SQL Server Management Studio to move to the Cloud

This post is branching off of another post I wrote recently, “Move an On Premise SQL Server Database to the SQL Azure Cloud” where I explained how to move an on premise database to the cloud using the Export/Import Data-tier application. After some comments on this tip, research and testing I think it would be beneficial for the SQL community to understand the different options of moving to the cloud.

If you’d like to follow along with the examples I would suggest creating a free (trial) account at http://www.windowsazure.com. Once you are logged into the Windows Azure portal a SQL Server will need to be created.

Click on SQL Databases, Servers, Create a SQL Database Server:

SQL Freelancer SQL Server Azure
Create a login name, password, and choose your region and click the check mark:

SQL Freelancer SQL Server Azure
A new SQL Server should be built in a few seconds! Click Manage at the bottom and a few firewall rules options may appear. Click Yes on all of them.

SQL Freelancer SQL Server Azure
Next, click on the server, and click Dashboard:

SQL Freelancer SQL Server Azure
On the right side of the screen you will see the full SQL Server name. In this example, the name is ns9rkrmwj9.database.windows.net. Write this name down, you’ll need it later.

SQL Freelancer SQL Server Azure
Now that we have a SQL Azure Server built, let’s move our databases.

Option 1: Using the Deploy Database to SQL Azure Wizard

In SQL Server 2012, there is a new wizard that will allow you to move an on premise database to SQL Azure. This is only available in SQL Server 2012 since SQL Azure was nonexistent in previous versions.

To use this wizard, open SQL Server Management Studio (SSMS) and connect to the server. Right click the database you want to move, click Tasks, Deploy Database to SQL Azure…

SQL Freelancer SQL Server Azure
Click here to view the rest of this post.


SQL Server Partition Wizard

SQL Server Partitioning can be a bit confusing and can lead some companies in a different direction as far as archiving data. Writing the T-SQL code to create partition functions, partition schemes, and then altering the table to use the partition can be overwhelming for some DBA’s. SQL Server 2008 introduced a table partitioning wizard in SQL Server Management Studio that helps make this task easier. In this post, I’ll show you how to use this wizard.  Let’s jump in.

Based on my experience, it seems as if SQL Server table partitioning is not commonly used and I’m not sure if it’s because of the complexity and management of partitions or if companies simply don’t have the knowledge of partitioning data.  This tip will focus on the SQL Server Partitioning wizard as opposed to the ins and outs of partitioning.

To start the wizard, right click on the table you want to partition in SQL Server Management Studio and select Storage, Create Partition. In this example, I’m using AdventureWorks2012.Production.TransactionHistory.

SQL Freelancer SQL Server Partition Wizard

On the Select a Partitioning Column screen as shown below you will need to select the column that you want to use to partition your table. The most common column used is a date column since most tables are being archived by date. In this example, I’ll choose TransactionDate so I’ll partition my table based on the date when the transaction was entered into this table.

Other options include:

Collocate this table to the selected partition table: Displays related data to join with the column being partitioned.

Storage Align Non Unique Indexes and Unique Indexes with an Indexed Partition Column: Aligns all indexes of the table being partitioned with the same partition scheme. If you do not select this option, you may place indexes independently of the columns they point to.

SQL Freelancer SQL Server Partition Wizard
The next screen, Select a Partition Function, is where you will create the partition function. This will create a function that maps the rows of the table or index into partitions based on the values of the TransactionDate column. In this example, I’ll name the function TransactionHistoryFunction.
SQL Freelancer SQL Server Partition Wizard
The next screen, Select a Partition Scheme, is where you will create the partition scheme. This will create a scheme that maps the partitions of the Production.TransactionHistory table to different filegroups. In this example, I’ll name the scheme TransactionHistoryScheme.

SQL Freelancer SQL Server Partition Wizard
The next screen, Map Partitions, is where you will map your partitions.

SQL Freelancer SQL Server Partition Wizard
Click here to view the rest of this post.

Understanding Column Properties for a SQL Server Table

Designing a table can be a little complicated if you don’t have the correct knowledge of data types, relationships, and even column properties. In this post, I’ll go over the column properties and provide examples.

To create a new table using SSMS, expand the tree for a database and right click on Tables and select “New Table…” as shown below.

SQL Freelancer SQL Server Table Column Properties
A new window will open and once you enter a Column Name and a Data Type you will see the appropriate Column Properties for that data type as shown below:

SQL Freelancer SQL Server Table Column Properties

Note: Some properties only appear for certain data types

OK, let’s go over each property.


(Name)

Name, simply, is the name of the column. You can change the name of the column in the table design view or in the column properties.


Allow Nulls

Allow Nulls indicates whether or not the column will allow null values. If the column does not allow null values then some sort of data must be put into this record. You can change this value in the table design view by checking/unchecking the Allow Nulls box or from the column properties.


Data Type

Data type, like its name implies, is the type of data stored for the column. You can learn more about data types in this article. You can change the data type in the table design view or the column properties.


Default Value or Binding

The Default Value option will allow you to enter a default value in case a value is not specified in an insert statement. For example, let’s say we have three columns in a table named Demo (Column1, Column2, and Column3) and we put a value of 50 in the Default Value or Binding for Column2.

SQL Freelancer SQL Server Table Column Properties

In the query below we are inserting data to Column1 and Column3, but nothing for Column2 so this will get the default value of 50.

INSERT INTO DEMO (Column1, Column3)
VALUES (1, ‘Brady Upton')

Our result set should be:

SQL Freelancer SQL Server Table Column Properties
By creating a default value, this also creates a default constraint automatically as well as shown below:

SQL Freelancer SQL Server Table Column Properties


Length

Length displays the number of characters for character-based data types. For example, nvarchar(50) has a length of 50. You can change the length in table design view or column properties.


Collation

Collation can be specified at the instance level, database level, and even down to the column level. This property displays the collating sequence that SQL Server applies to the column. To change the collation using column properties, click the ellipsis and choose the collation:

SQL Freelancer SQL Server Table Column Properties

Computed Column Specification

Computed Column Specification displays information about a computed column. A computed column is a logical column that is not physically stored in the table unless the column is marked as Persisted (see Is Persisted below)

  • Formula: This field is where you can use formula’s. (See below for an example)
  • Is Persisted: This field indicates whether the results of the formula are stored in the database or are calculated each time the column is referenced

Click here to view the rest of this post.


Managing SQL Server Extended Events in Management Studio

SQL Server 2012 introduces a GUI in SQL Server Management Studio to create and manage extended events. Prior to the SQL Server 2012 integration, Extended Events could only be created using T-SQL. In this tip, I’ll show you step by step process on how to create a simple Extended Event in SQL Server 2012 using the new GUI in SQL Server Management Studio.

Creating an Extended Event has never been easier with SQL Server 2012. Open SSMS, and drilldown to Management, Extended Events, Sessions as shown in the image below.  By default, you should see an AlwaysOn_health and a system_health session already created. You will notice the AlwaysOn_health session is disabled and the system_health session is running. The system_health session collects system data that you can use to help troubleshoot performance issues. For the most part, SQL Server Extended Events use very little resources.

SQL Freelancer SQL Server Extended Events Management Studio SSMS
There are two ways to create a session. Right click on the Sessions folder and you can choose New Session or New Session Wizard. In this tip, we’ll step through using the wizard.

SQL Freelancer SQL Server Extended Events Management Studio SSMS

After clicking New Session Wizard, an Introduction window will appear that will give you a brief introduction. Click the “Next” button to continue.

The next window, Set Session Properties, is where you can specify the session name and whether or not you want the session to start on server start-up. In this tip, I’ll name the session DB Monitor and choose to start the event session at server start-up. Click the “Next” button to continue.

SQL Freelancer SQL Server Extended Events Management Studio SSMS
The next screen will allow us to choose a preconfigured template or create our own. If you’ve ever used SQL Server Profiler’s built in template, these function the same way. In this tip, we’ll create our own. Choose the “Do not use a template” option and click the “Next” button to continue.

SQL Freelancer SQL Server Extended Events Management Studio SSMS
The “Select Events To Capture” window is an important one. This is where we select the events we want to capture. For this example, I want to monitor when my DB goes offline and when it becomes available, so I’ll choose the events that relate to this: database_attached, database_created, database_detached, database_started, and database_stopped. Once you select the events from the “Event library” (on the left), click the right arrow to move them to the “Selected events” (on the right). Click the “Next” button to continue.

SQL Freelancer SQL Server Extended Events Management Studio SSMS

Click here to view the rest of this post.

SQL Server User Defined Server Roles

A new feature to SQL Server 2012 is the ability to create user defined server roles and assign server level/scope permissions to these roles. DBA’s have always had the ability to create user defined database roles which act as a security layer at the database level, but we’ve never been able to create roles at the server level until SQL Server 2012.

In this post I will show you how to create user defined server roles using T-SQL and SQL Server Management Studio.

What Permissions Can Be Assigned

First, to view the list of permissions that can be assigned to a user defined server role run the following query:

USE master 
GO
SELECT * FROM sys.fn_builtin_permissions(DEFAULT) 
WHERE class_desc IN ('ENDPOINT','LOGIN','SERVER','AVAILABILITY GROUP','SERVER ROLE') 
ORDER BY class_desc, permission_name
GO

Create a Server Role in T-SQL

To create a server role called “juniordba” use the following:

USE master
GO
CREATE SERVER ROLE juniordba

Next we will create a login called Brady and then add it to the new juniordba role that was created:

USE master 
GO
ALTER SERVER ROLE juniordba ADD MEMBER Brady

We haven’t added any permissions to the server role, so Brady shouldn’t have access. To test this we can login as Brady and run the following query:

SELECT * FROM sys.dm_exec_connections

As you can see we get the following error message:

Msg 297, Level 16, State 1, Line 1 The user does not have permission to perform this action.

Click here to view the rest of this post.

Client Statistics

A feature often overlooked while tuning queries is Client Statistics located right on SSMS editor bar.

SQL Freelancer SQL Server Client Statistics
Other ways of opening Client Statistics include:

SHIFT + ALT + S and Menu Bar – Query -> Include Client Statistics

SQL Freelancer SQL Server Client Statistics

Client Statistics is useful when the user needs to gather information about execution times, processing times, the amount of data sent between client and server, etc. it’s very easy to use. Simply turn it on using one of the methods above and execute your query.

In this example I’m using the following query:

SELECT pc.FirstName
,pc.LastName
,pc.EmailAddress
,he.Title
,hh.Rate
FROM Person.Contact pc
JOIN HumanResources.Employee he ON pc.ContactID = he.ContactID
JOIN HumanResources.EmployeePayHistory hh ON he.EmployeeID = hh.EmployeeID
WHERE hh.Rate > 10
ORDER BY hh.Rate

After executing the query you will notice a new tab labeled Client Statistics:

SQL Freelancer SQL Server Client Statistics

After looking at the statistics provided for Trial 1 you can see the processing time = 39ms, execution time = 46ms, etc.

After the running the same query again I get the following results under Trial 2:

SQL Freelancer SQL Server Client Statistics
This time processing time went up to 45ms and execution time went up to 51ms. It also has an average column to compare overall results. The green and red arrows represent differences between trials. Green arrows indicate improved statistics and red arrows indicate degrading statistics.

A max of 10 trials can be run with the 11th trial dropping the 1st trial and so on. To reset statistics, on the menu bar, go to Query, Reset Client Statistics.

SQL Freelancer SQL Server Client StatisticsThis is great when tuning indexes because you can see different statistics as you add/delete indexes.