Performance Tuning Series – Storage Optimization: Maximizing Disk Performance

Efficient storage management is critical for SQL Server performance, as disk I/O is often the slowest component in the entire system. Poor disk performance can cause bottlenecks, leading to slow query response times and general system sluggishness. Optimizing storage involves using the right hardware, configuring SQL Server for optimal use of that hardware, and regularly maintaining the data stored on disk.

Understanding the Role of Disk I/O in SQL Server

SQL Server heavily relies on disk I/O to store and retrieve data. Every query that retrieves data from a table, reads or writes logs, or handles tempdb operations, interacts with the disk. Efficient storage optimization can drastically reduce I/O latency and increase throughput, leading to faster query execution times. Key areas where disk I/O impacts performance include:

  • Data and Index Pages: Stored on disk and loaded into memory when queried.
  • Transaction Logs: Sequential writes to disk that track all database modifications.
  • Tempdb: A shared workspace for temporary data storage, often involving frequent disk I/O.
  • Backups and Restores: Operations that require significant disk activity.

To minimize the impact of disk I/O on performance, several best practices can help ensure SQL Server maximizes its disk performance.

Best Practices for SQL Server Storage Optimization

1. Use High-Performance Storage Solutions

The type of storage you choose for SQL Server has a significant impact on overall performance. Mechanical hard drives (HDDs) are slow and can cause performance bottlenecks, especially in high-transactional environments. Instead, use the following types of storage for better performance:

  • Solid-State Drives (SSDs): SSDs offer faster read/write speeds compared to traditional spinning disks (HDDs). SSDs reduce the time it takes to retrieve data from disk, making them ideal for SQL Server databases that require low-latency access.
    • Best Practice: Use SSDs for your data, log files, and tempdb. This will drastically reduce I/O wait times, leading to faster query response times.
  • NVMe Drives: NVMe (Non-Volatile Memory Express) drives provide even better performance than SSDs by using a direct connection to the CPU, bypassing the traditional SATA interface. NVMe drives can offer lower latency and higher throughput, making them ideal for databases with high I/O demands.
    • Best Practice: For mission-critical databases that handle large volumes of transactions or queries, consider using NVMe drives for primary storage.
  • SAN (Storage Area Network): For larger environments, a SAN can offer centralized, high-speed storage. Ensure that your SAN is properly configured to handle the database workload, with enough bandwidth and redundancy to avoid bottlenecks.

2. Separate Data, Log, and Tempdb Files

SQL Server performs different types of I/O operations on its data, transaction log, and tempdb files, and these should be managed separately for optimal performance:

  • Data Files (MDF/NDF): These files handle random I/O as SQL Server reads and writes data across different parts of the database.
  • Transaction Logs (LDF): Transaction logs are written sequentially, and disk I/O is generally sequential. Transaction logs require high write performance to ensure efficient logging and recovery.
  • Tempdb Files: Tempdb handles temporary objects and query operations, and it often experiences high I/O. High activity in tempdb can lead to contention and performance degradation.

Best Practice: Place data, log, and tempdb files on separate physical drives or storage volumes to prevent I/O contention. This ensures that heavy I/O on one file type (such as a data read) does not slow down other critical operations like logging or tempdb transactions.

3. Optimize I/O Through Disk Striping (RAID)

Redundant Array of Independent Disks (RAID) is a technology used to improve disk performance and redundancy by distributing data across multiple drives. Different RAID levels provide varying balances of performance, redundancy, and cost.

  • RAID 1 (Mirroring): Provides redundancy by duplicating data across two drives. It offers fault tolerance but no performance benefits.
  • RAID 5 (Striping with Parity): Distributes data across several disks, with parity for fault tolerance. RAID 5 improves read performance but may suffer from slow write performance due to the overhead of parity calculations.
  • RAID 10 (Mirroring and Striping): Combines RAID 1 and RAID 0 to provide both redundancy and performance. RAID 10 offers faster read/write speeds and is ideal for high-performance SQL Server environments, although it requires more drives and is costlier.

Best Practice: For SQL Server, RAID 10 is often recommended for data files due to its balance of performance and fault tolerance. Transaction logs benefit from RAID 1, as sequential writes don’t require the parity overhead of RAID 5.

4. Optimize Tempdb Performance

Tempdb is a shared system database that handles temporary data, intermediate results for queries, and row versioning. It can become a significant performance bottleneck, especially in high-concurrency environments.

  • Best Practice: To optimize tempdb:
    • Use multiple tempdb files: SQL Server allows you to configure multiple tempdb data files to reduce contention and improve throughput. Ideally, you should have one tempdb file per logical CPU core (up to 8 cores).
    • Place tempdb on fast storage: Since tempdb is highly I/O-intensive, place it on the fastest storage available (preferably SSD or NVMe).
    • Monitor tempdb usage: Regularly monitor tempdb for signs of contention (such as high waits on PFS, GAM, or SGAM pages). This can indicate the need for additional tempdb files or further optimization.

5. Monitor Disk I/O Performance

Regularly monitoring disk performance is essential to identify and address bottlenecks before they affect SQL Server. You can use SQL Server’s built-in tools and OS-level monitoring tools to track I/O performance.

  • Best Practice: Monitor the following key metrics:
    • Disk Latency: Track disk latency (measured in milliseconds). Ideally, disk read/write latency should be under 10ms for SSDs and under 1ms for NVMe drives. High latency indicates storage performance issues.
    • Disk Queue Length: This metric shows how many requests are waiting to be processed by the disk. Long disk queues indicate that SQL Server is overloading the storage subsystem.
    • Read/Write IOPS: Input/output operations per second (IOPS) provide a measure of how efficiently your storage can handle the database’s read/write workload. Compare actual IOPS with the capacity of your storage hardware to ensure it meets the demand.
  • Tools for Monitoring:
    • SQL Server Performance Monitor (PerfMon): Tracks disk performance counters like Avg. Disk sec/Read and Avg. Disk sec/Write, providing insight into disk latency.
    • SQL Server Dynamic Management Views (DMVs): DMVs like sys.dm_io_virtual_file_stats offer real-time insights into SQL Server disk I/O activity at the database and file level.

6. Enable Data Compression

SQL Server offers data compression features that can reduce the size of data stored on disk, leading to lower storage requirements and potentially improved performance by reducing I/O.

  • Best Practice: Consider enabling row-level or page-level compression on tables that experience heavy read activity. Compression reduces the number of data pages SQL Server has to read from disk, decreasing I/O and improving query performance.
    • Row-Level Compression: Minimizes the storage footprint of individual rows without adding significant CPU overhead.
    • Page-Level Compression: Compresses data at the page level, providing greater space savings, but requires more CPU resources.

Regularly review data access patterns to determine which tables or indexes would benefit most from compression, particularly in environments with large datasets and frequent queries.

7. Regular Index Maintenance

Fragmented indexes can cause SQL Server to perform extra I/O when retrieving data, leading to performance issues. Regular index maintenance ensures that SQL Server performs efficiently.

  • Best Practice: Rebuild or reorganize fragmented indexes periodically to optimize disk usage and reduce unnecessary I/O.
    • Use index rebuilds for heavily fragmented indexes (over 30% fragmentation) to completely rebuild the index structure.
    • Use index reorganization for moderately fragmented indexes (10-30% fragmentation) to re-sort data pages without fully rebuilding the index.

Automate index maintenance tasks to ensure they are regularly performed without manual intervention.

Conclusion

Storage optimization is key to achieving high performance in SQL Server environments. By using the right storage hardware, segregating data, log, and tempdb files, utilizing RAID configurations, and regularly monitoring disk performance, you can minimize I/O bottlenecks and ensure your SQL Server operates efficiently. When combined with regular index maintenance, compression, and proper tempdb management, a well-optimized storage system forms the foundation of a performant SQL Server instance.

Performance Tuning Series – Memory Management

Memory management plays a pivotal role in SQL Server performance. SQL Server uses memory for various purposes, including caching data, storing query plans, and running queries. Proper memory configuration ensures that SQL Server uses resources efficiently, providing optimal query response times and preventing performance degradation. Mismanagement, however, can lead to high memory pressure, slow query execution, or even out-of-memory errors.

SQL Server’s Memory Architecture

SQL Server primarily relies on two types of memory: Buffer Pool and Query Workspace Memory. The Buffer Pool is responsible for caching data pages to reduce disk IO operations, while Query Workspace Memory is used for sorting, hashing, and other operations that require in-memory processing during query execution. Understanding how SQL Server uses memory can help in diagnosing and optimizing memory-related issues.

Best Practices for Memory Management

  1. Set Appropriate Maximum and Minimum Memory Limits:
    • SQL Server dynamically allocates memory, but by default, it can use almost all available system memory, potentially starving other processes (including the operating system) of necessary resources. To prevent this, it’s essential to configure the Maximum Server Memory setting in SQL Server.
    • Best Practice: Set the max server memory to leave sufficient memory for the OS and other critical processes. A general recommendation is to reserve around 10-20% of the total system memory for the operating system.
    • Example: If your server has 32 GB of RAM, you might configure SQL Server to use 25-28 GB, leaving 4-6 GB for the OS and other applications.
    • The min server memory setting is usually less critical but can be useful in environments where SQL Server competes with other applications for memory. Setting a reasonable minimum ensures that SQL Server has a baseline of memory even during high competition for system resources.
  2. Monitor and Manage Memory Pressure:
    • Memory pressure occurs when SQL Server runs low on available memory for operations, leading to performance degradation. There are two main types of memory pressure: internal (caused by SQL Server needing more memory than what’s allocated) and external (caused by other processes on the same server consuming memory).
    • Best Practice: Monitor key indicators like page life expectancy (PLE), which measures how long a page stays in the buffer pool before being flushed out. A rapidly declining PLE may signal memory pressure, as pages are being flushed from memory too quickly. Values under 300 seconds typically indicate memory pressure.
  3. Optimize Buffer Pool Usage:
    • SQL Server’s Buffer Pool is a crucial area of memory used to cache frequently accessed data pages, reducing the need for disk IO, which is much slower. Efficient buffer pool management can drastically improve database performance by minimizing physical reads.
    • Best Practice: Ensure that enough memory is available to store hot data sets in the buffer pool. Regularly accessed tables and indexes should ideally fit into memory to avoid constant paging to and from disk.
    • Use the sys.dm_os_buffer_descriptors DMV to monitor buffer pool utilization and identify which database pages are consuming the most memory. If large, rarely used tables are consuming too much memory, consider indexing or partitioning strategies to optimize memory usage.
  4. Monitor Query Workspace Memory:
    • Query Workspace Memory is used for internal operations like sorting, hashing, and other in-memory data processing tasks. If these operations consume too much memory, SQL Server will spill them to disk, significantly slowing down query execution due to the additional IO overhead.
    • Best Practice: Monitor the sort warnings and hash warnings using the sys.dm_exec_query_stats DMV. These warnings indicate that SQL Server ran out of memory and had to spill to disk during a query operation. If such warnings are frequent, consider increasing the available memory or optimizing the queries involved to use less memory.
    • Query operations that sort large result sets or perform complex joins are often memory-intensive. You can reduce memory consumption by rewriting queries to process fewer rows, adding indexes to avoid large sorts, or splitting the workload into smaller, more manageable batches.
  5. Control Memory for In-Memory OLTP:
    • SQL Server offers In-Memory OLTP (also known as Hekaton), which stores data in memory-optimized tables, providing faster read and write access. However, In-Memory OLTP comes with its own memory management considerations since all data in memory-optimized tables must fit into memory.
    • Best Practice: Ensure that the server has sufficient memory to store both memory-optimized tables and other critical SQL Server processes. Set a dedicated memory pool for In-Memory OLTP using the memory_optimized_data configuration. This helps SQL Server manage how much memory can be used for In-Memory OLTP without starving other processes.
    • Monitor the memory usage of In-Memory OLTP via the sys.dm_db_xtp_table_memory_stats DMV to ensure it’s functioning efficiently and not consuming an excessive amount of memory.
  6. Optimize SQL Server for NUMA (Non-Uniform Memory Access) Architecture:
    • NUMA is a memory architecture that divides memory into nodes associated with specific CPUs. SQL Server is NUMA-aware and can optimize memory usage based on the NUMA configuration, improving performance for multi-CPU systems.
    • Best Practice: Ensure that SQL Server is correctly configured to take advantage of NUMA. If SQL Server is running on a NUMA-enabled server, monitor NUMA node memory allocation using the sys.dm_os_nodes DMV. SQL Server can experience bottlenecks if memory allocations are not balanced across NUMA nodes, so check for uneven workloads across nodes.
    • If necessary, configure SQL Server’s affinity mask settings to control which CPUs and NUMA nodes SQL Server uses, ensuring that memory access remains efficient.
  7. Cache and Plan Management:
    • SQL Server caches query execution plans in memory to avoid recompiling the same queries repeatedly, reducing CPU load and speeding up query execution. However, inefficient query plans or cache bloating can waste memory and degrade performance.
    • Best Practice: Regularly monitor the plan cache using the sys.dm_exec_cached_plans DMV to identify and remove inefficient or rarely used plans. You can also look for parameter sniffing issues, where SQL Server generates an inefficient plan based on initial parameter values and reuses it for other queries, even if it’s not optimal.
    • Use optimize for ad hoc workloads configuration to reduce memory consumption by ad hoc queries. This setting caches only the plan stub for single-use queries, instead of the full plan, reducing memory overhead for queries that are executed only once.

Monitoring and Diagnosing Memory Issues

    • SQL Server provides several dynamic management views (DMVs) to help you monitor memory usage:
      • sys.dm_os_sys_memory: Provides an overview of the system’s memory usage, including total memory, available memory, and memory pressure status.
      • sys.dm_os_memory_clerks: Shows detailed information about memory clerks, which are internal components that track memory usage for various SQL Server operations like buffer pool and query execution.
      • sys.dm_exec_memory_grants: Displays memory grants for currently executing queries, helping to identify queries that are consuming large amounts of memory.
    • Regularly review these DMVs to ensure memory is being used efficiently, and address any queries or operations that are causing excessive memory consumption.

Conclusion

Efficient memory management is crucial for ensuring SQL Server performs at its best. By setting appropriate memory limits, monitoring key metrics, and optimizing memory usage across the buffer pool, query workspace, and In-Memory OLTP, you can prevent memory bottlenecks and ensure that your database server runs smoothly. Proper memory management, combined with regular monitoring, allows you to proactively address issues and maintain optimal performance for your SQL Server instances.

Performance Tuning Series – Indexing Strategies: The Cornerstone of Performance

In today’s data-driven world, the performance of your SQL Server databases is critical to the success of your business. Slow queries, lagging response times, and inefficient resource utilization can lead to significant downtime, affecting your bottom line. Optimizing SQL Server performance isn’t just about quick fixes; it requires a strategic approach to database design, indexing, and query optimization. In this blog post series, we’ll explore best practices that can help you enhance the performance of your SQL Server databases, ensuring they run efficiently and reliably starting with Indexing Strategies.

Indexes are fundamental to SQL Server performance optimization. They work by creating a structured pathway to your data, allowing the SQL Server engine to locate rows much faster than it would by scanning an entire table. However, indexing is a double-edged sword: while proper indexing can dramatically improve query performance, poor indexing strategies can lead to slower performance, increased storage requirements, and higher maintenance costs.

Understanding the Types of Indexes

Before diving into best practices, it’s crucial to understand the types of indexes available in SQL Server and their specific use cases:

  • Clustered Indexes: A clustered index determines the physical order of data in a table. There can only be one clustered index per table because the data rows themselves are stored in the index structure. This type of index is ideal for columns frequently used in range queries, such as date ranges, where the physical ordering of data can speed up retrieval. When a table has a clustered index, the table is called a clustered table. If a table has no clustered index, its data rows are stored in an unordered structure called a heap or heap table.
  • Non-Clustered Indexes: Unlike clustered indexes, non-clustered indexes create a separate structure within the table that holds the index key values and pointers to the corresponding data rows. A table can have multiple non-clustered indexes, and they are beneficial for speeding up searches, sorts, and joins on columns that aren’t the primary key.
  • Unique Indexes: These are non-clustered indexes that enforce uniqueness on the indexed columns. They are crucial for ensuring data integrity, particularly on columns like email addresses or social security numbers.
  • Full-Text Indexes: Used to support full-text queries against character-based data, these indexes are ideal for columns containing large texts, like product descriptions or document contents. They are particularly useful for implementing search features within your database.

Key Indexing Best Practices:

  1. Choose the Right Columns for Indexing:
    • Focus on columns used frequently in WHERE, JOIN, ORDER BY, and GROUP BY clauses. These are the columns that SQL Server must search, sort, or join often, making them prime candidates for indexing.
    • Index foreign key columns to improve join performance between related tables.
    • Consider indexing columns used in filters, for example, a WHERE clause, that can reduce the number of rows returned significantly, as this can drastically speed up query performance.
  2. Avoid Over-Indexing:
    • While indexing can improve read performance, each additional index incurs a cost in terms of storage space and the time required for write operations (INSERT, UPDATE, DELETE). Each time data is modified, SQL Server must also update the associated indexes, which can lead to slower performance for write-heavy applications.
    • To avoid over-indexing, periodically review the indexes in your database using SQL Server’s sys.dm_db_index_usage_stats DMV. This view helps identify indexes that are rarely used or never used at all, which can be candidates for removal.
  3. Implement Covering Indexes:
    • A covering index includes all the columns referenced in a query, meaning the query can be satisfied entirely from the index without having to access the actual data table. This reduces IO operations and can significantly speed up query performance.
    • For example, if a query frequently selects columns A, B, and C, create a non-clustered index on these columns. The SQL Server engine can then retrieve the needed data directly from the index, bypassing the need for key lookups.
  4. Consider the Order of Columns in Multi-Column Indexes:
    • The order of columns in a multi-column index matters. Place the most selective column (the one that narrows down the result set the most) first in the index. This strategy ensures that SQL Server can effectively reduce the number of rows to be processed early in the execution plan.
    • For instance, if you have an index on columns (LastName, FirstName), but most of your queries filter by FirstName, you might want to reverse the order to (FirstName, LastName) for better performance.
  5. Monitor and Maintain Indexes Regularly:
    • Index fragmentation can degrade performance over time, particularly on large tables. Fragmentation occurs when the logical order of pages in an index does not match the physical order, leading to inefficient read operations.
    • Regularly rebuild or reorganize indexes to mitigate fragmentation. Rebuilding an index recreates the entire index, removing fragmentation but at the cost of higher resource usage. Reorganizing is a lighter operation that compacts the index and defragments it without fully recreating it.
    • I recommend using Ola Hallengren’s maintenance solution for index maintenance, but you can also use the built-in SQL Server Maintenance Plan Wizard or other custom scripts to schedule and automate index maintenance tasks.
  6. Leverage Filtered Indexes:
    • Filtered indexes are non-clustered indexes that include only a subset of rows from the table, based on a defined filter condition. They are particularly useful when you only need to index a portion of the data.
    • For example, if a table stores both active and inactive records, and most queries only access active records, you can create a filtered index on the Status column where Status = 'Active'. This smaller index consumes less storage and is faster to maintain while improving query performance for the active records.

Performance Troubleshooting

When diagnosing performance issues, poorly optimized indexes are often the culprit. Tools like Brent Ozar’s sp_BlitzIndex, SQL Server Execution plans, and SQL Server DMV’s can provide index recommendations based on the workload. However, these recommendations should be carefully evaluated before implementation, as they might not always align with your database’s specific needs.

Indexing + Partitioning

For very large tables, consider combining indexing with partitioning. Partitioning divides a table into smaller, more manageable pieces, each of which can be indexed independently. This strategy can significantly improve performance, especially for queries that target specific partitions, such as date ranges.

Conclusion

Effective indexing is both an art and a science, requiring a deep understanding of your data, queries, and SQL Server’s behavior. By implementing these indexing strategies, you can ensure your SQL Server databases perform at their best, providing quick, efficient access to the data your business depends on.

Correct SQL Server TempDB Spills in Query Plans Caused by Outdated Statistics

Statistics are an integral part of SQL Server and query performance. In short, the query optimizer uses statistics to create query plans that will improve the overall performance of the queries ran. Each statistic object is created on a list of one or more table columns and includes a histogram displaying the distribution of values in the first column. The histogram can have up to 200 steps, but no more regardless of the number of rows in the column or index.

In this post we’ll take a look at one specific performance issue that you might find in an execution plan of a query. If you’ve ever noticed the following warning, then this post is for you:

1 - TempDB spills
Within the AdventureWorks2014 DB, I’ll use the following query for my example:

SELECT BusinessEntityID, FirstName, LastName, EmailPromotion
FROM [AdventureWorks2014].[Person].[Person]
WHERE EmailPromotion > 0
ORDER BY LastName

Looking at this query I can already tell contention may be present so I’ll go ahead and add a covering index:

CREATE NONCLUSTERED INDEX [IX_Person_EmailPromotion_INCLUDES]
ON [Person].[Person] ([EmailPromotion])
INCLUDE ([BusinessEntityID],[FirstName],[LastName])

When adding the index above, statistics were automatically created and updated. Since the addition of this index I’ve added a few thousand rows to the Person table.

Let’s run the query and make sure the “Include Actual Execution Plan” button is selected.

2 - TempDB spills

After the query executes let’s take a look at the execution plan by clicking on the tab in the Results pane:

3 - TempDB spills
These warnings were added to SQL Server Management Studio 2012 so if you’re using an older version you may not see this. The spill data to TempDB warning means that the query was not granted enough memory to finish the operation and spilled over into the TempDB to complete the operation. We all know reading from memory is much faster than reading from disk and this is exactly what is happening here. The query read as much as it could from memory before moving over to the TempDB disk.

Click here to view the rest of this post.

SQL Server 2016 Compare Showplan Option

Just released in SQL Server 2016 CTP 2.4 is a new feature that will allow us to compare execution plans. The main purpose of this feature is to provide a side-by-side comparison of two execution plans. This makes it easier to find similarities and changes on each plan. This is a very nice enhancement that aids in troubleshooting issues such as understanding the impact of rewriting queries or observing how a design change, such as an index, may impact the plan. In the tip below, we’ll go over how it works.

For this post, I’m using the AdventureWorks2014 database and I’m going to use the following query:

SELECT FirstName, LastName, CreditCardID 
FROM Person.Person p 
INNER JOIN Sales.PersonCreditCard c ON p.BusinessEntityID = c.BusinessEntityID
WHERE p.ModifiedDate > '2014-01-01'

pen SQL Server Management Studio (SSMS) 2016 and execute the query with SET STATISTICS IO ON and “Include Actual Execution plan“ enabled.

1-Compare Showplan SQL FreelancerClick the Messages tab and you’ll notice that we’re doing 3819 logical reads on the Person table. This is a sign that this query can be tuned. We’d like to get this number to the lowest possible.

2-Compare Showplan SQL Freelancer

Click the execution plan tab and you’ll see the plan along with some Missing Index Details.

3-Compare Showplan SQL Freelancer

The execution plan is what we’ll focus on in this tip, but I wanted to look at STATISTICS IO also to see if we can improve the number of logical reads.

To be able to compare plan we’ll need to save the execution plan. Right click anywhere in the plan window and select Save Execution Plan As… Choose a name and location and hit Save.

Click here to view the rest of this post.

Creating SQL Server performance based reports using Excel

I’m not a big fan of Performance Monitor but in this post we will review the steps in how to export the results so they can be read more easily in Excel.  This post will not discuss how to setup a data collector set and will assume the reader already has results saved to the file system in a .blg file format.

If you’ve ever used PerfMon you’ve probably noticed .blg files. These are the files that hold all of our performance data that we have collected over the past week. When you open this file in PerfMon it can be tedious work to get the data in a presentable form. Actually, I don’t know if there’s a good way to get this data in a presentable form using the PerfMon’s GUI.

SQL Freelancer SQL Server PeSQL Freelancer SQL Server Perfmon Graph Excel

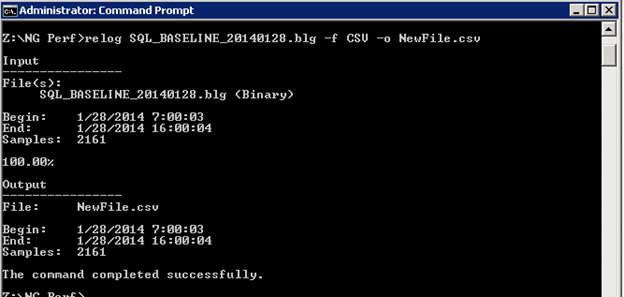
First thing we need to do is to convert the .blg to .csv so we can open it in Excel. To convert this file open command prompt and navigate to the directory the file is located and type:

Relog SQL_BASELINE_20140128.blg –f CSV –o NewFile.csv

SQL Freelancer SQL Server Perfmon Graph Excel
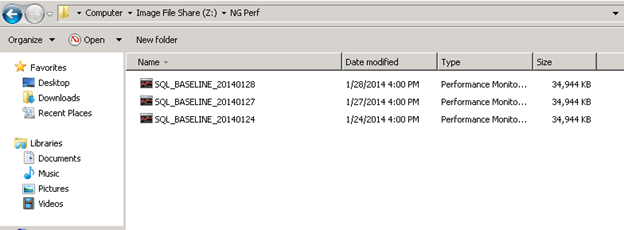
Once the command completes successfully, you should see the new file in the same directory:

SQL Freelancer SQL Server Perfmon Graph Excel

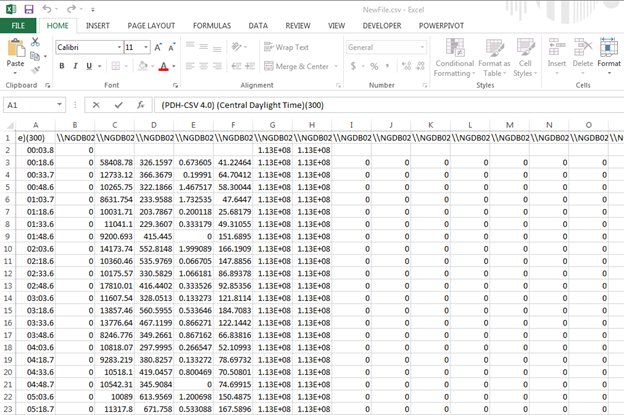
Open NewFile.csv in Excel:

SQL Freelancer SQL Server Perfmon Graph Excel

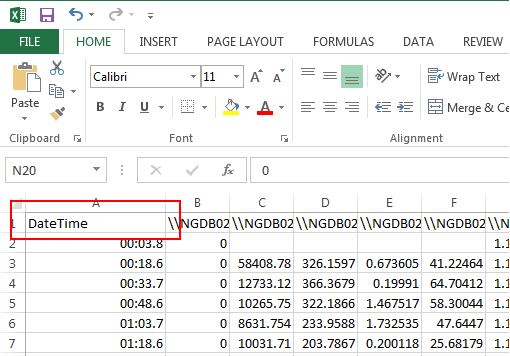
Not pretty huh? First thing we need to do is format the first column….which is the Date column. Change the text in the A1 cell from PDH-CSV 4.0…. to DateTime:

SQL Freelancer SQL Server Perfmon Graph Excel

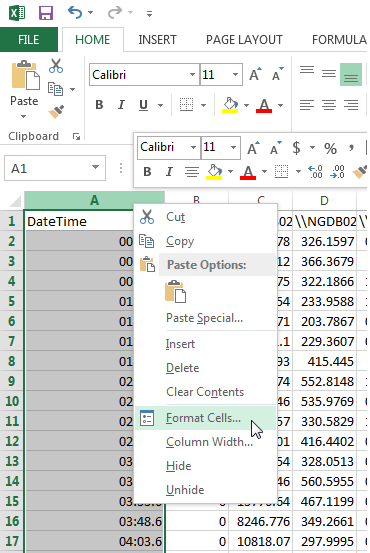
Next, remove Row 2. We do not need this data. Also, highlight column A and right click anywhere in the column and choose Format Cells:

SQL Freelancer SQL Server Perfmon Graph Excel

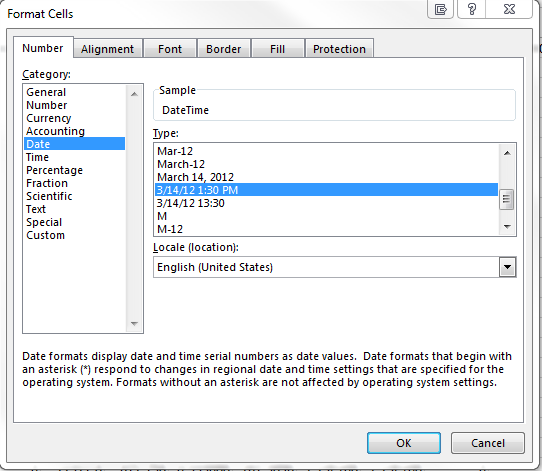
On the number tab, click the Data Category and select 3/14/2012 1:30PM:

SQL Freelancer SQL Server Perfmon Graph Excel

Press Ctrl+Home to select the A1 cell.

Create Pivot Chart

Click on the Insert tab and select Pivot Chart:

SQL Freelancer SQL Server Perfmon Graph Excel

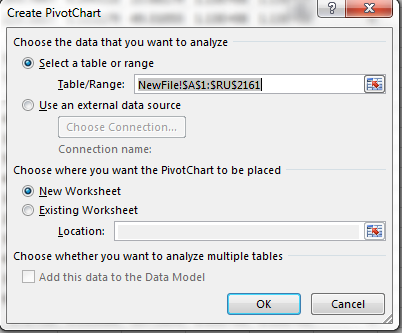
The Pivot Chart dialog box should automatically select the correct cells to analyze. If not, make sure all of the cells are selected:

SQL Freelancer SQL Server Perfmon Graph Excel

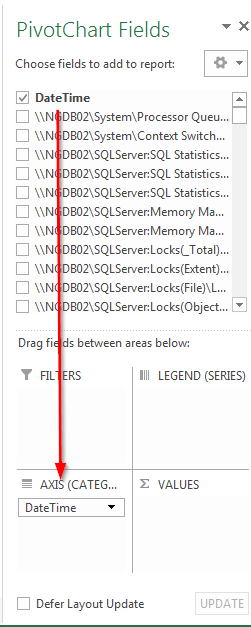
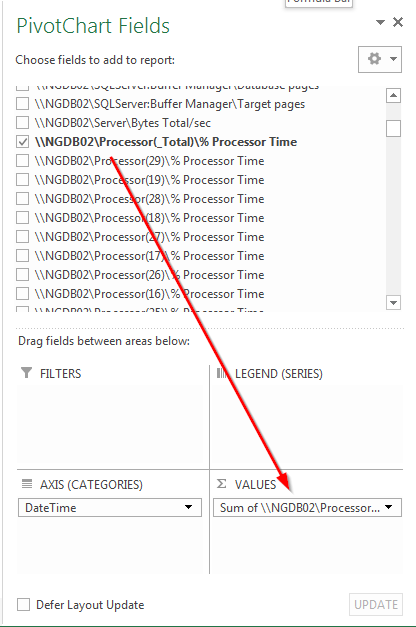
Once the new worksheet opens, drag DateTime to the Axis Fields pane:

SQL Freelancer SQL Server Perfmon Graph Excel

Now, depending on what counter(s) you want to analyze, drag it down to the Values pane. For this example, I’ll analyze Processor(_Total)\% Processor Time:

SQL Freelancer SQL Server Perfmon Graph Excel

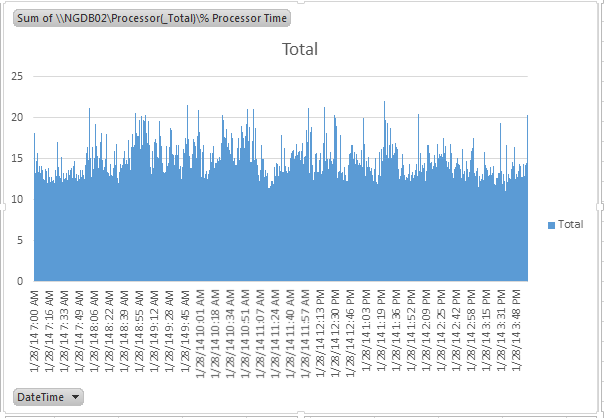
Ta da! You now have a graph that displays your Processor %.

SQL Freelancer SQL Server Perfmon Graph Excel

To make this presentable, simply format the graph to your liking and you’re done.

SQL Server Index Properties in Management Studio

Understanding indexes and how they work can be complicated enough for a Jr. DBA, but throw in all the different options and properties and an index can soon be overwhelming. In this post, I’ll discuss the different options available when creating a basic index.

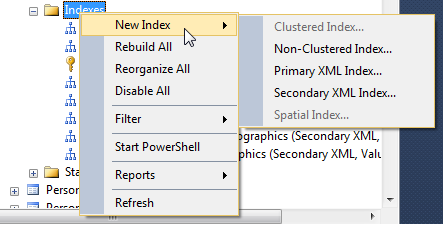
To create an index using SSMS, expand the tree for a table and right click on Indexes and select New Index: (This tip will not discuss the anatomy of an index, but will focus on the properties.)

SQL Freelancer SQL Server Index Properties

After choosing the index type, you will notice that there a few tabs on the left side that will define how your index will act. These tabs will differ between SSMS versions but basically have the same information. In this tip, we’ll be using SQL Server 2012 SSMS.

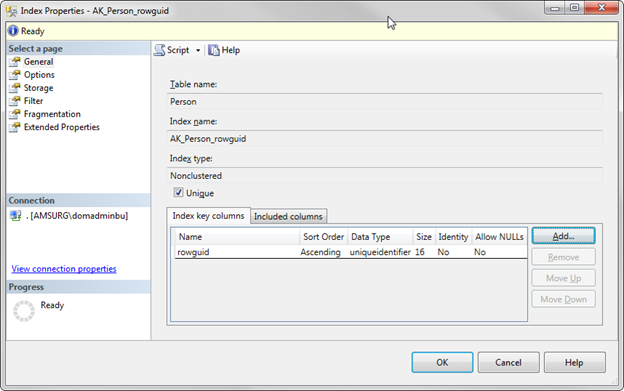
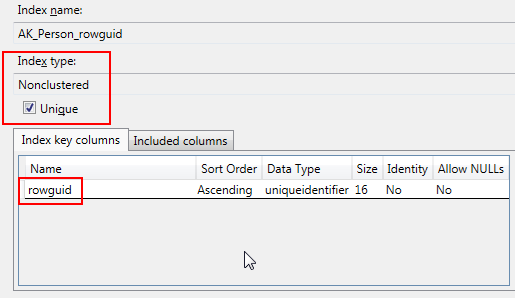
The first tab, General, is where you can set the index name, the key columns, and the included columns (if any). This tab also shows the table name and index type you selected:

SQL Freelancer SQL Server Index Properties
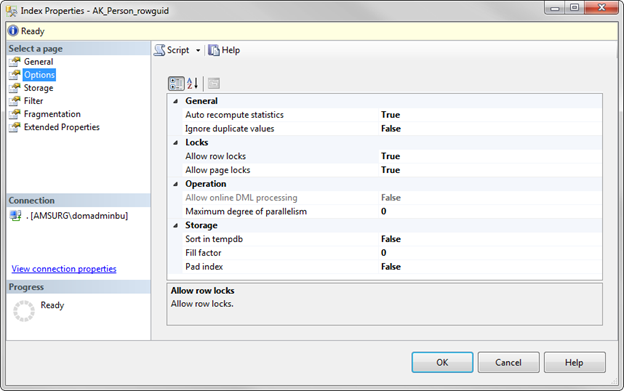
The next tab, Options, is where you can view or modify the properties for the index:

SQL Freelancer SQL Server Index Properties

Let’s go over each property.

Index Properties Options Page

We will begin with the options page.

Auto recompute statistics

This property defines whether or not you want SQL Server to automatically update the index statistics. Best practice is to leave this option set to True, otherwise you will have to manually update the statistics.

According to Microsoft, statistics are considered outdated when the following happens:

  • The table size has gone from 0 to >0 rows.
  • The number of rows in the table when the statistics were gathered was 500 or less, and the column modification counters (colmodctr) of the leading column of the statistics object has changed by more than 500 since then.
  • The table had more than 500 rows when the statistics were gathered, and the colmodctr of the leading column of the statistics object has changed by more than 500 + 20% of the number of rows in the table when the statistics were gathered.

Outdated statistics can lead to performance problems.

As the link above states, the statistics auto update is triggered by query optimization or by execution of a complied plan, and it involves only a subset of the columns referred to in the query.

Ignore duplicate values

This property specifies where a duplicate key value can be inserted into the column that is part the index. If set to “True”, SQL Server will issue a warning when an INSERT statement is about to create a duplicate key and will ignore the duplicate row. If this option is set to “False”, SQL Server will issue an error message and rolls back the INSERT statement.

Example:

In this example (AdventureWorks2012.Person.Person), I have a Non-clustered, unique index. My key column is rowguid.

SQL Freelancer SQL Server Index Properties
I’ve set the Ignore duplicate values to “False”

SQL Freelancer SQL Server Index Properties

If I try to INSERT a duplicate value for rowguid, I get the following error:

Msg 2601, Level 14, State 1, Line 1 Cannot insert duplicate key row in object ‘Person.Person’ with unique index ‘AK_Person_rowguid’. The duplicate key value is (92c4279f-1207-48a3-8448-4636514eb7e2). The statement has been terminated.

If I change the Ignore duplicate values to “True” and try to INSERT a duplicate value for rowguid I get the following:

(0 row(s) affected)

As you can see, neither of these inserted the duplicate value because it was a UNIQUE index but one returned an error message and ended the statement while the other didn’t return an error. If I was inserting multiple records the first message would have rolled back the transaction while the second message would have inserted all the unique values and skipped over the unique record.

The default value for this option is “False” and can only be used on UNIQUE indexes.

Click here to view the rest of this post.

SQL Server Integration Services Data Type Conversion Testing

There are two ways of converting data types within SQL Server Integration Services (SSIS).  Here is an overview of those options:

  • One way is using T-SQL code. Using the CAST function in your code can convert one data type into another. The scope of this tip is not intended on going into detail about the CAST function, but I will show a quick example.
  • The second way is using the Data Conversion Transformation Task. This task will convert the data in an input column to a different data type and then copy it to the output column. The task itself isn’t too complicating to setup as I’ll show you in this tip.

SQL Server Integration Services Data Conversion Task to Convert Data Types

Let’s look at the Data Conversion task first…

First, open Visual Studio (or Business Intelligence Dev Studio if you’re using pre SQL Server 2012) and create an SSIS project. Next, we can go ahead and configure a Connection Manager to our database. Right click Connection Managers in Solution Explorer and choose New Connection Manager:

SQL Freelancer SQL Server SSIS Data Type Conversion
Choose your Connection Manager type. In this example, we’ll use OLEDB. Next, configure the Connection Manager to point to your dataset. In this example, I’ll use localhost and the AdventureWorks2008R2 database:
SQL Freelancer SQL Server SSIS Data Type Conversion
Test the connection and click OK. Next, drag a Data Flow task from the SSIS toolbox onto the design screen:

SQL Freelancer SQL Server SSIS Data Type Conversion
Right click the Data Flow task and choose Edit. You are now inside the data flow task. This is where all the action happens. Drag an OLEDB source task from the SSIS toolbox to the design screen:

SQL Freelancer SQL Server SSIS Data Type Conversion
Right click the OLEDB task and choose Edit. This screen is where we will define the Connection Manager we created earlier. Under OLEDB connection manager choose the connection you created. Leave data access mode as Table or view. Change the name of the table or the view to the table that contains the data types to change. In this example, I’ll use a table named Sales.CurrencyRate:

SQL Freelancer SQL Server SSIS Data Type Conversion
To preview the data click Preview. In my example, I want to change the CurrencyRateDate and the ModifiedDate columns from a datetime data type to a date data type:

SQL Freelancer SQL Server SSIS Data Type Conversion
Click OK to close the OLEDB Source task. Drag the Data Conversion Transformation task onto the design screen. Connect the OLEDB Source task to the Data Conversion task:

SQL Freelancer SQL Server SSIS Data Type Conversion
Right click the Data Conversion task and choose Edit. Here is where we will convert our data types. Since I am converting CurrencyRateDate and ModifiedDate I will click on each of them in the Available Input Columns list:

SQL Freelancer SQL Server SSIS Data Type Conversion

Click here to view the rest of this post.


SQL Server Simple and Forced Parameterization

There are two different parameterization options that one can use in SQL Server. Simple parameterization and Forced parameterization. Let’s discuss each a little more in detail.

Simple Parameterization

When you execute a SQL statement without parameters, SQL Server internally will add parameters where needed so that it can try to reuse a cached execution plan. For example, if you look at the execution plan of the following statement you will see that SQL Server changes the WHERE value to a parameter (@1):

SELECT * FROM AdventureWorks2012.Sales.CreditCard WHERE CreditCardID = 11

SQL Freelancer SQL Server Parameterization

SQL Server builds this execution plan as if a parameter was the input instead of the number 11. Because of this parameterization, the following two statements show an example of SQL Server reusing the same execution plan even though the data results are different:

SELECT * FROM AdventureWorks2012.Sales.CreditCard WHERE CreditCardID = 11
SELECT * FROM AdventureWorks2012.Sales.CreditCard WHERE CreditCardID = 207

SQL Freelancer SQL Server Parameterization

This is the default behavior for Simple parameterization, however, it only applies to a small class of queries. If you want all your queries parameterized, you will need to enable the option, Forced parameterization.

Forced Parameterization

Forced parameterization is when the database engine parameterizes any literal value that appears in a SELECT, UPDATE, INSERT, or DELETE statement submitted in any form, but there are a few exceptions.  Refer to this article for a list of these exceptions.

Some applications use queries that pass in literals as opposed to stored procedures that pass in parameters. For these type of applications you may want to experiment with enabling Forced parameterization to see if it has a positive effect on the workload by reducing query compilations.

Running the following query in Simple parameterization produces the following execution plan where the WHERE clause is not parameterized:

SQL Freelancer SQL Server Parameterization
Click here to view the rest of this post.

Detecting CPU Pressure

There are a few different ways to detect CPU pressure, for example, Performance Monitor or SQL Profiler, but in this tip we’ll discuss the wait type SOS_SCHEDULER_YIELD and the DMV sys.dm_os_schedulers.

Some of you might have seen the wait type SOS_SCHEDULER_YIELD and wondered what in the world is this? Books Online (BOL) describes this wait type as:

Occurs when a task voluntarily yields the scheduler for other tasks to execute. During this wait the task is waiting for its quantum to be renewed.

SOS_SCHEDULER_YIELD is a fairly common wait type and occurs when there is CPU pressure. SQL Server runs multiple threads and tries to allow all threads to run without problems. However, if all the threads are busy on each scheduler and can’t let other threads run, it will yield itself for another thread, which in turn creates the SOS_SCHEDULER_YIELD wait type.

You can see the top wait stats and the percentage of waits at the current point in time by running the following query by Tim Ford and Glenn Berry.

WITH Waits AS 
( 
SELECT 
wait_type, 
wait_time_ms / 1000. AS wait_time_s, 
100. * wait_time_ms / SUM(wait_time_ms) OVER() AS pct, 
ROW_NUMBER() OVER(ORDER BY wait_time_ms DESC) AS rn 
FROM sys.dm_os_wait_stats 
WHERE wait_type 
NOT IN 
('CLR_SEMAPHORE', 'LAZYWRITER_SLEEP', 'RESOURCE_QUEUE', 
'SLEEP_TASK', 'SLEEP_SYSTEMTASK', 'SQLTRACE_BUFFER_FLUSH', 'WAITFOR', 
'CLR_AUTO_EVENT', 'CLR_MANUAL_EVENT') 
) -- filter out additional irrelevant waits 
SELECT W1.wait_type, 
CAST(W1.wait_time_s AS DECIMAL(12, 2)) AS wait_time_s, 
CAST(W1.pct AS DECIMAL(12, 2)) AS pct, 
CAST(SUM(W2.pct) AS DECIMAL(12, 2)) AS running_pct 
FROM Waits AS W1 
INNER JOIN Waits AS W2 ON W2.rn <= W1.rn 
GROUP BY W1.rn, 
W1.wait_type, 
W1.wait_time_s, 
W1.pct 
HAVING SUM(W2.pct) - W1.pct < 95; -- percentage threshold;

After running this query on one of my servers I can see that only 2.22% of my waits are due to CPU pressure so I can rule that out as a cause for poor performance. (This is only current since the last SQL Service restart):

SQL Freelancer SQL Server CPU Pressure DMV

If you see a high percentage of this wait type then one way of troubleshooting this is to use the DMV sys.dm_os_schedulers. BOL describes sys.dm_os_schedulers as:

Returns one row per scheduler in SQL Server where each scheduler is mapped to an individual processor. Use this view to monitor the condition of a scheduler or to identify runaway tasks.

This DMV has several columns including number or workers, active tasks, and the status of each scheduler, etc., which can help troubleshoot certain problems, but the most important column is the one used for measuring queued tasks, the runnable_tasks_count column. This column displays the count of tasks yielding to other tasks resulting in a SOS_SCHEDULER_YIELD wait type. If this column is frequently greater than 0 then CPU pressure may be present and blocking may occur.

To see an average of current tasks and current waiting tasks you can use the following query:

SELECT AVG(current_tasks_count) AS [Avg Current Task], 
AVG(runnable_tasks_count) AS [Avg Wait Task]
FROM sys.dm_os_schedulers
WHERE scheduler_id < 255
AND status = 'VISIBLE ONLINE'

SQL Freelancer SQL Server CPU Pressure DMV
Click here to view the rest of this post.