I wrote a post a few weeks about creating an Azure Windows VM so wanted to follow up with a post about creating an AWS Windows VM to compare both platforms. I like Azure and AWS so I’m not going to throw either one under the bus. Both are great and easy to use.
Let’s create an AWS (EC2) Windows VM.
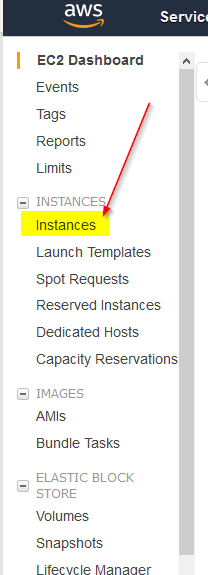
Log into the AWS portal and click on EC2 under All Services, Compute:

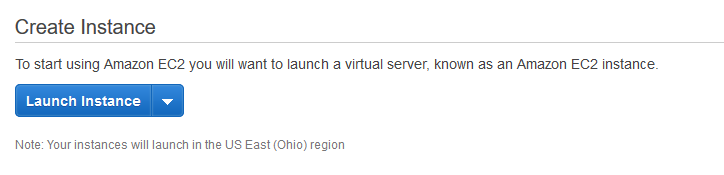
Next, click Launch Instance:
Step 1 allows you to choose an Amazon Machine Image or AMI. There are tons of options here, but for this post, I’m going to use Microsoft Windows Server 2019 Base

Once I click Select, I’m brought to Step 2: Choose an Instance Type. Instance Types comprise varying combinations of CPU, memory, storage, and networking capacity and give you the flexibility to choose the appropriate mix of resources for your applications. Each instance type includes one or more instance sizes, allowing you to scale your resources to the requirements of your target workload. More info here: https://aws.amazon.com/ec2/instance-types/
For this post, and for cost sake, I’m going to use the free tier t2.micro type which is 1 CPU, 1GB RAM

Once I’ve selected my instance type I’ll click Next:Configure Instance Details.
Step 3: Configure Instance Details is where we’ll configure our new server. Let’s go down the list.
- Number of Instances – This is the number of servers you want to create. If you need 5 of the same servers, this makes it easy.
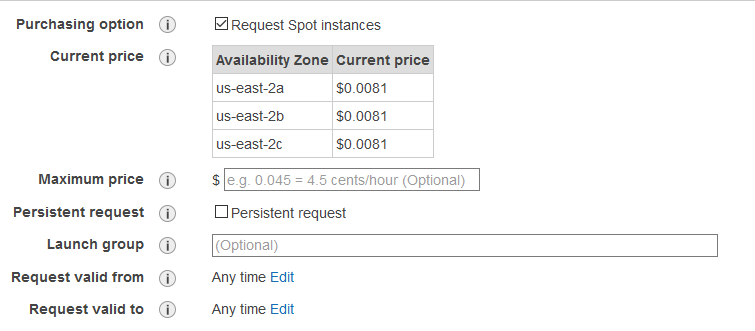
- Spot Instances – A Spot Instance is an unused EC2 instance that is available for less than the On-Demand price. Because Spot Instances enable you to request unused EC2 instances at steep discounts, you can lower your Amazon EC2 costs significantly. The hourly price for a Spot Instance is called a Spot price. The Spot price of each instance type in each Availability Zone is set by Amazon EC2, and adjusted gradually based on the long-term supply of and demand for Spot Instances. Your Spot Instance runs whenever capacity is available and the maximum price per hour for your request exceeds the Spot price.
- Network – The network you want the new server to join. You can create an Amazon Virtual Private Cloud (VPC) and select your own IP address range, subnets, gateways, etc. Learn more here: https://us-east-2.console.aws.amazon.com/vpc/home?region=us-east-2
- Subnet: the range of IP addresses in your VPC that can be used to isolate different EC2 resources from each other or the internet.
- Auto-assign Public IP – requests a public IP address from Amazon’s public IP address pool, to make the server reachable from the internet.
- Placement Group: You can launch or start instances in a placement group, which determines how instances are placed on underlying hardware. When you create a placement group, you specify one of the following strategies for the group:
- Cluster – clusters instances into a low-latency group in a single Availability Zone
- Partition – spreads instances across logical partitions, ensuring that instances in one partition do not share underlying hardware with instances in other partitions
- Spread – spreads instances across underlying hardware
- There is no charge for creating a placement group. Learn more: https://docs.aws.amazon.com/AWSEC2/latest/UserGuide/placement-groups.html
- Capacity Reservations – enables you to reserve capacity for your Amazon EC2 instances in a specific Availability Zone for any duration. This gives you the ability to create and manage capacity reservations independently from the billing discounts offered by Reserved Instances (RI). By creating Capacity Reservations, you ensure that you always have access to EC2 capacity when you need it, for as long as you need it.
- Domain join directory – enables you to join a domain that you’ve already created.
- IAM role – automatically deploys AWS credentials to resources that assume it.
- Shutdown behavior – specifies what happens when an OS level shutdown is performed.
- Enabled termination protection – You can protect instances from being accidentally terminated. Once enabled, you won’t be able to terminate the instance until this option has been disabled.
- Monitoring – Monitor the instance with Amazon CloudWatch.
- Tenancy – You can select to run your server on a shared server or a dedicated server.
- Elastic Graphics – Enables graphic acceleration.
For this post I’ll use defaults and click Next.
Step 4 is Add Storage.
I’m not going to go over each Storage option, but you can get more info here: https://docs.aws.amazon.com/AWSEC2/latest/UserGuide/Storage.html?icmpid=docs_ec2_console

Selecting default and clicking next.
Step 5: Add Tags.
Like Azure, A tag consists of a case-sensitive key-value pair. For example, you could define a tag with key = Name and value = Webserver. A copy of a tag can be applied to volumes, instances or both. Tags will be applied to all instances and volumes
Click Next.
Step 6 is Configure Security Group
A security group is a set of firewall rules that control the traffic for your instance. On this page, you can add rules to allow specific traffic to reach your instance. For example, if you want to set up a web server and allow Internet traffic to reach your instance, add rules that allow unrestricted access to the HTTP and HTTPS ports. By default, the RDP port is added, but it allows all IP addresses to connect. Changing the Source column will allow you to filter what IP’s are able to RDP into the server. For this post, I’m going to change the Source column to allow “My IP”

Next…and last page is a summary of the options selected. To finish configuring the instance, click Launch.

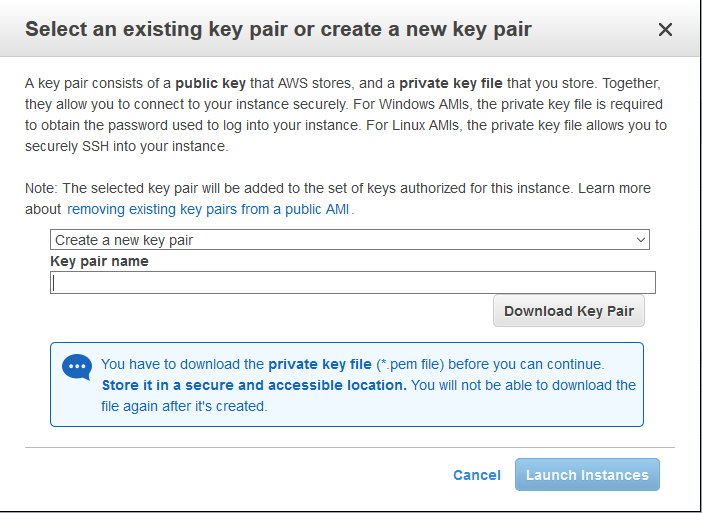
After clicking launch, you will see a popup where you can create or use an existing key pair. A key pair consists of a public key that AWS stores, and a private key file that you store. Together, they allow you to connect to your instance securely. For Windows AMIs, the private key file is required to obtain the password used to log into your instance. For Linux AMIs, the private key file allows you to securely SSH into your instance.
Once the new VM is created, you can go back to the EC2 dashboard and click on Instances to see the new VM: